Why adopt DB Analytics Tools ?
- Easy to learn : It is high level API and doesn't require any special effort to learn.
- Real problems solver : It is designed to solve real life problems of the Data Analyst.
- All in One : Support queries, Data Integration, Analysis, Visualization and Machine Learning.
Core Components
| # |
Component |
Description |
How to import |
| 0 |
db |
Database Interactions (Client) |
import db_analytics_tools as db |
| 1 |
dbi |
Data Integration & Data Engineering |
import db_analytics_tools.integration as dbi |
| 2 |
dba |
Data Analysis |
import db_analytics_tools.analytics as dba |
| 3 |
dbviz |
Data Visualization |
import db_analytics_tools.plotting as dbviz |
| 4 |
dbml |
Machine Learning & MLOps |
import db_analytics_tools.learning as dbml |
Install DB Analytics Tools
Dependencies
DB Analytics Tools requires the following dependencies:
- Python
- Psycopg2
- Pyodbc
- Pandas
- SQLAlchemy
- Streamlit
DB Analytics Tools can easily installed using pip.
pip install db-analytics-tools
Get Started
Setup client
As traditional databases clients, we need to provide database server ip address and port and credentials.
# Import DB Analytics Tools
import db_analytics_tools as db
# Database Infos & Credentials
ENGINE = "postgres"
HOST = "localhost"
PORT = "5432"
DATABASE = "postgres"
USER = "postgres"
PASSWORD = "admin"
# Setup client
client = db.Client(host=HOST, port=PORT, database=DATABASE, username=USER, password=PASSWORD, engine=ENGINE)
Note : DB Analytics Tools supports Postgres and SQL Server.
Data Definition Language
query = """
----- CREATE TABLE -----
drop table if exists public.transactions;
create table public.transactions (
transaction_id integer primary key,
client_id integer,
product_name varchar(255),
product_category varchar(255),
quantity integer,
unitary_price numeric,
amount numeric
);
"""
client.execute(query=query)
Data Manipulation Language
query = """
----- POPULATE TABLE -----
insert into public.transactions (transaction_id, client_id, product_name, product_category, quantity, unitary_price, amount)
values
(1,101,'Product A','Category 1',5,100,500),
(2,102,'Product B','Category 2',3,50,150),
(3,103,'Product C','Category 1',2,200,400),
(4,102,'Product A','Category 1',7,100,700),
(5,105,'Product B','Category 2',4,50,200),
(6,101,'Product C','Category 1',1,200,200),
(7,104,'Product A','Category 1',6,100,600),
(8,103,'Product B','Category 2',2,50,100),
(9,103,'Product C','Category 1',8,200,1600),
(10,105,'Product A','Category 1',3,100,300);
"""
client.execute(query=query)
Data Query Language
query = """
----- GET DATA -----
select *
from public.transactions
order by transaction_id;
"""
dataframe = client.read_sql(query=query)
print(dataframe.head())
transaction_id client_id product_name product_category quantity unitary_price amount
0 1 101 Product A Category 1 5 100.0 500.0
1 2 102 Product B Category 2 3 50.0 150.0
2 3 103 Product C Category 1 2 200.0 400.0
Manage sessions
You can simply show current queries for current user.
# You can simply show current queries for current user.
client.show_sessions()
# You can cancel query by its session_id.
client.cancel_query(10284)
# You can go further cancelling on lock
client.cancel_locked_queries()
Implement SQL based ETL
ETL API is in the integration module db_analytics_tools.integration. Let's import it ans create an ETL object.
# Import Integration module
import db_analytics_tools.integration as dbi
# Setup ETL
etl = dbi.ETL(client=client)
ETLs for DB Analytics Tools consists in functions with date parameters. Everything is done in one place i.e on the database. So first create a function on the database like this :
query = """
----- CREATE FUNCTION ON DB -----
create or replace function public.fn_test(rundt date) returns integer
language plpgsql
as
$$
begin
--- DEBUG MESSAGE ---
raise notice 'rundt : %', rundt;
--- EXTRACT ---
--- TRANSFORM ---
--- LOAD ---
return 0;
end;
$$;
"""
client.execute(query=query)
Run a function
Then ETL function can easily be run using the ETL class via the method ETL.run()
# ETL Function
FUNCTION = "public.fn_test"
# Dates to run
START = "2023-08-01"
STOP = "2023-08-05"
# Run ETL
etl.run(function=FUNCTION, start_date=START, stop_date=STOP, freq="d", reverse=False)
Function : public.fn_test
Date Range : From 2023-08-01 to 2023-08-05
Iterations : 5
[Runing Date: 2023-08-01] [Function: public.fn_test] Execution time: 0:00:00.122600
[Runing Date: 2023-08-02] [Function: public.fn_test] Execution time: 0:00:00.049324
[Runing Date: 2023-08-03] [Function: public.fn_test] Execution time: 0:00:00.049409
[Runing Date: 2023-08-04] [Function: public.fn_test] Execution time: 0:00:00.050019
[Runing Date: 2023-08-05] [Function: public.fn_test] Execution time: 0:00:00.108267
Run several functions
Most of time, several ETL must be run and DB Analytics Tools supports running functions as pipelines.
# ETL Functions
FUNCTIONS = [
"public.fn_test",
"public.fn_test_long",
"public.fn_test_very_long"
]
# Dates to run
START = "2023-08-01"
STOP = "2023-08-05"
# Run ETLs
etl.run_multiple(functions=FUNCTIONS, start_date=START, stop_date=STOP, freq="d", reverse=False)
Functions : ['public.fn_test', 'public.fn_test_long', 'public.fn_test_very_long']
Date Range : From 2023-08-01 to 2023-08-05
Iterations : 5
*********************************************************************************************
[Runing Date: 2023-08-01] [Function: public.fn_test..........] Execution time: 0:00:00.110408
[Runing Date: 2023-08-01] [Function: public.fn_test_long.....] Execution time: 0:00:00.112078
[Runing Date: 2023-08-01] [Function: public.fn_test_very_long] Execution time: 0:00:00.092423
*********************************************************************************************
[Runing Date: 2023-08-02] [Function: public.fn_test..........] Execution time: 0:00:00.111153
[Runing Date: 2023-08-02] [Function: public.fn_test_long.....] Execution time: 0:00:00.111395
[Runing Date: 2023-08-02] [Function: public.fn_test_very_long] Execution time: 0:00:00.110814
*********************************************************************************************
[Runing Date: 2023-08-03] [Function: public.fn_test..........] Execution time: 0:00:00.111044
[Runing Date: 2023-08-03] [Function: public.fn_test_long.....] Execution time: 0:00:00.123229
[Runing Date: 2023-08-03] [Function: public.fn_test_very_long] Execution time: 0:00:00.078432
*********************************************************************************************
[Runing Date: 2023-08-04] [Function: public.fn_test..........] Execution time: 0:00:00.127839
[Runing Date: 2023-08-04] [Function: public.fn_test_long.....] Execution time: 0:00:00.111339
[Runing Date: 2023-08-04] [Function: public.fn_test_very_long] Execution time: 0:00:00.140669
*********************************************************************************************
[Runing Date: 2023-08-05] [Function: public.fn_test..........] Execution time: 0:00:00.138380
[Runing Date: 2023-08-05] [Function: public.fn_test_long.....] Execution time: 0:00:00.111157
[Runing Date: 2023-08-05] [Function: public.fn_test_very_long] Execution time: 0:00:00.077731
*********************************************************************************************
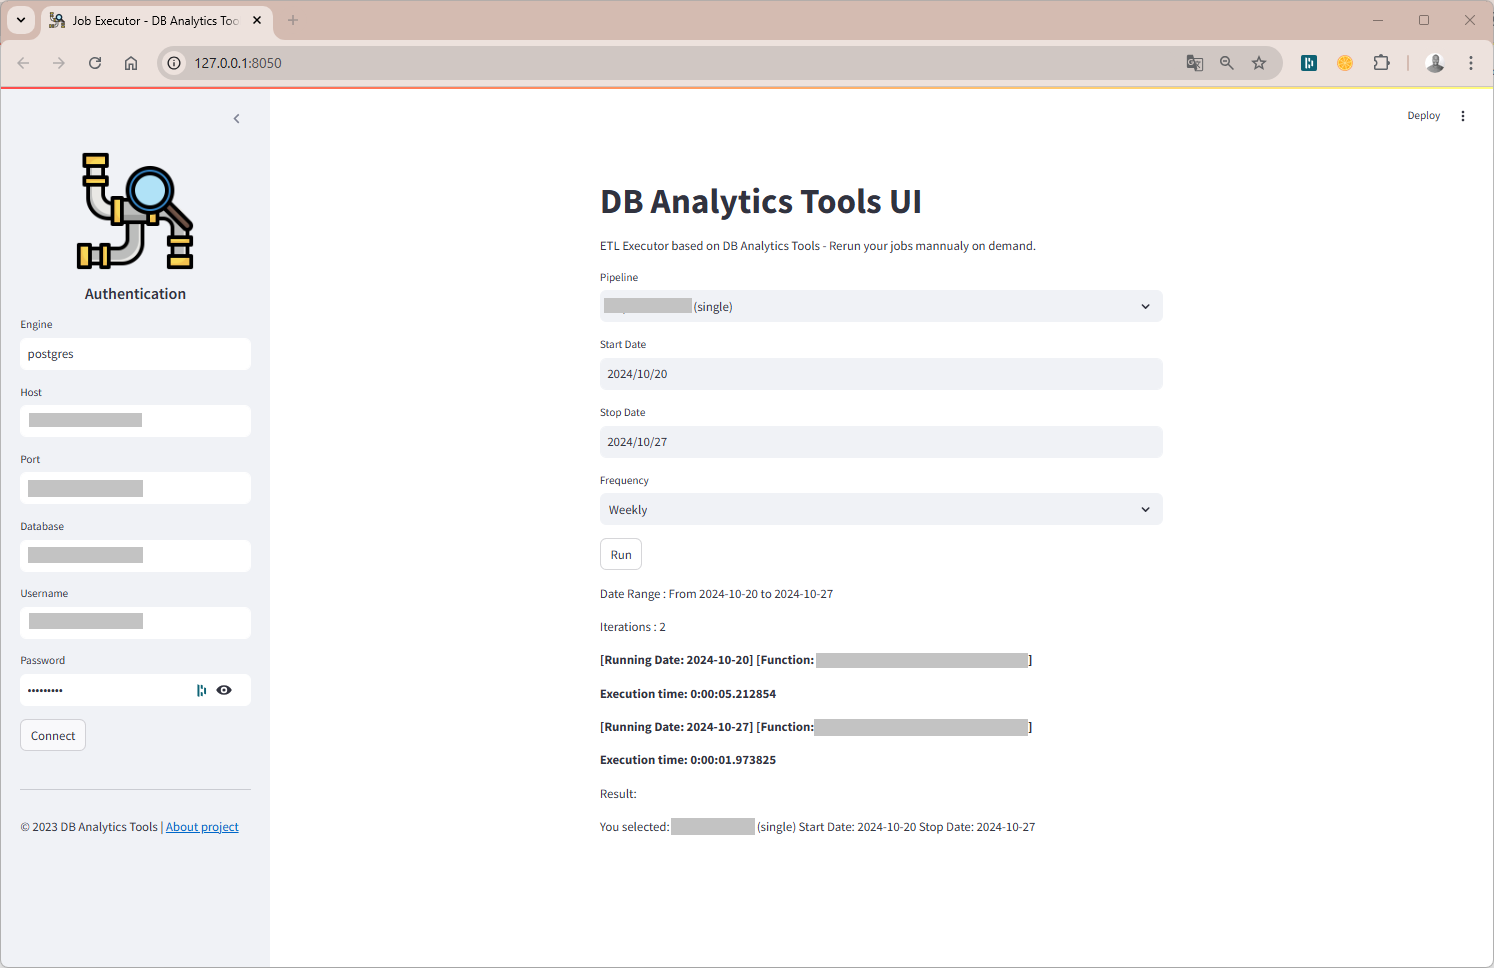
Get started with the UI
DB Analytics Tools UI is a web-based GUI db_analytics_tools.webapp. No need to code, all you need is a JSON config file. Run the command below :
db_tools start --config config.json --address 127.0.0.1 --port 8050
Interact with Airflow
We also provide a class for interacting with the Apache Airflow REST API.
# Import Airflow class
from db_analytics_tools.airflow import AirflowRESTAPI
# Airflow Config
AIRFLOW_BASE_URL = "http://localhost:8080"
AIRFLOW_API_ENDPOINT = "api/v2/"
AIRFLOW_USERNAME = "airflow"
AIRFLOW_PASSWORD = "airflow"
# Create an instance
airflow = AirflowRESTAPI(AIRFLOW_BASE_URL, AIRFLOW_API_ENDPOINT, AIRFLOW_USERNAME, AIRFLOW_PASSWORD)
# Get list of DAGs
airflow.get_dags_list(include_all=False).head(10)
# Get a DAG details
airflow.get_dag_details(dag_id="my_airflow_pipeline", include_tasks=False)
# Get list of tasks of a DAG
airflow.get_dag_tasks(dag_id="my_airflow_pipeline").head(10)
# Trigger a DAG
airflow.trigger_dag(dag_id="my_airflow_pipeline", start_date='2025-03-11', end_date='2025-03-12')
# Backfill a DAG
airflow.backfill_dag(dag_id="my_airflow_pipeline", start_date='2025-03-01', end_date='2025-03-12', reprocess_behavior="failed")
Forecasting
DB Analytics Tools also provides a class for forecasting KPIs based on historical data. It uses the STL decomposition method to decompose time series into trend, seasonal and residual components.
# Import Forecast class
from db_analytics_tools.learning import ForecastKPI
# Create an instance
forecast = ForecastKPI(historical_data=df, date_column="dt")
# Summary
print(forecast.describe())
# Decomposition
decomposition_result = forecast.decompose_time_series(kpi_name='active_1d', period=7, model='additive', plot=True)
print(decomposition_result.trend.head())
print(decomposition_result.seasonal.head())
Help and Support
If you need help on DB Analytics Tools, please send me an message on Whatsapp or send me a mail.
Contributing
Please see the contributing docs.
Maintainer
DB Analytics Tools is maintained by Joseph Konka.
Joseph is a Data Science Professional with a focus on Python based tools.
He developed the base code while working at Yas Togo to automate his daily tasks.
He packages the code into a Python package called SQL ETL Runner which becomes Databases Analytics Tools.
For more about Joseph Konka, please visit joekakone.github.io.